Some users might find Windows Search quite helpful, but others just want to search their system quickly for specific files or folders. This is why third-party search tools have become quite popular. UltraSearch, Agent Ransack, and WizFile are well-known free tools, but Voidtools Everything is perhaps the most popular.
More recent Windows Search versions have included bloated features like Cortana integration and Bing web search. This is why straightforward and efficient search tools are so useful. They give you what you want, not what someone else thinks you should see.
Here I show you how to use Everything and another third-party tool to pretty much replace Windows Search.
Everything Search
There are a few things that make Everything such a useful tool. Firstly, it’s incredibly fast to produce search results due to efficient file indexing. It can also automatically index current or new drives so you won’t need to manually add a drive when it’s attached.
It’s worth noting that Everything has quite an advanced searching feature if required. Experienced users can opt to use REGEX search syntax. Intermediate and more novice users can still perform quite complex searches. Wildcards (*) or boolean syntax (such as | for OR, use ! for exclude) are available and easy to use.

To achieve what we want to do here, Everything needs to remain running at all times so it can continually index files in the background. The best way to do this, while also avoiding issues with User Account Control, is to let Everything run as a Service.
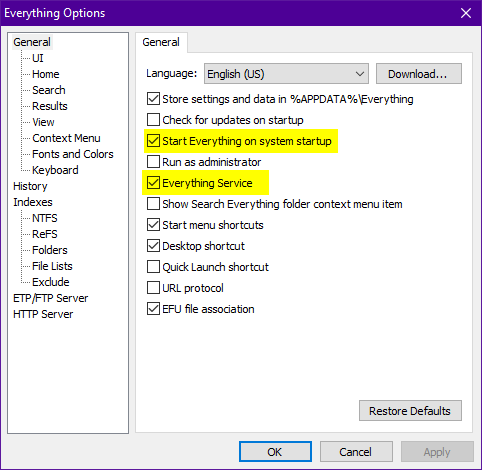
During installation, Everything will default to installing as a Service and you shouldn’t need to change any other settings during setup. If you already have Everything installed, press CTRL+P to enter Options and enable “Everything Service” and “Start Everything on system startup” in the General tab. Optionally disable the tray icon from the UI tab.
EverythingToolbar
While Everything makes searching for files in Windows possible here, EverythingToolbar is required to help you better replace Windows Search. EverythingToolbar is not associated with Everything directly but the two complement each other really well. This will give you a fast and efficient search function that excludes the bloat in Windows Search these days.
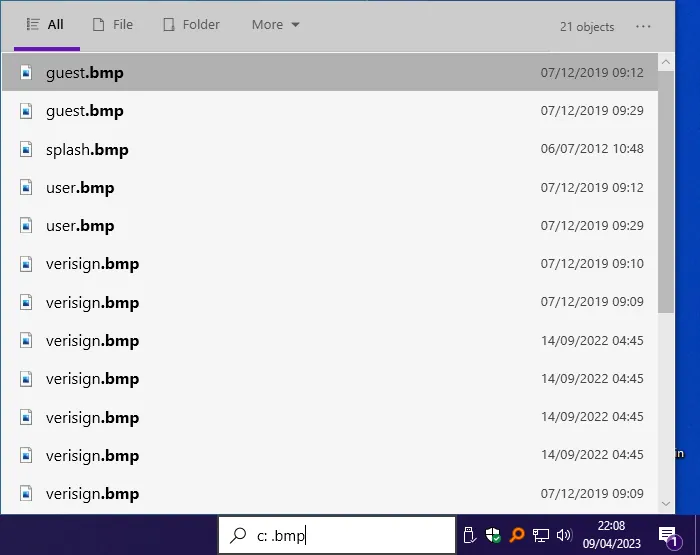
EverythingToolbar adds a search icon or a text entry box to the Windows Taskbar. This will pop up a search dialog window that shows live search results from Everything as you type. It’s similar to the Everything search main window but has been styled more closely to the Windows 10/11 modern theme.
EverythingToolbar will be set up differently depending on whether you’re running Windows 10 or Windows 11.
Setup EverythingToolbar in Windows 10
The recommended option in Windows 10 is a text entry box on the Taskbar to instantly type in search terms. To add the EverythingToolbar text box you need to right-click on the Taskbar, go to the Toolbars menu, and select “Everything Toolbar” from the list. It is important to enter the Toolbars menu twice as the option won’t appear the first time.
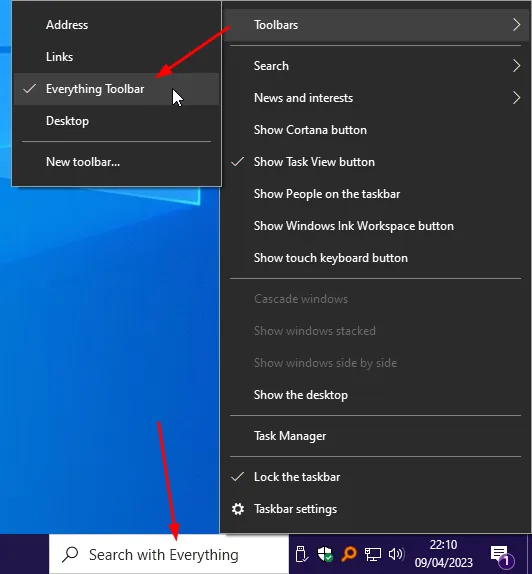
A search icon will appear near the Notification area. You can leave the icon as is and access it with a mouse click or using a hotkey. Alternatively, right-click on the Taskbar, uncheck “Lock the Taskbar”, then drag the divider next to the icon to reveal the box. Adjust the size and position to your liking and relock the Taskbar.
Setup EverythingToolbar in Windows 11
Because the Windows 11 Taskbar was redesigned from the ground up, there isn’t the ability to show a text entry box like Windows 10. Instead, you get a search icon on the Taskbar that will pop up the results windows once triggered.
After installation, a Setup Assistant will show to guide you through the process of adding a new search icon to the Taskbar. First, select the icon style, then right-click the assistant icon on the Taskbar and select “Pin to Taskbar”.
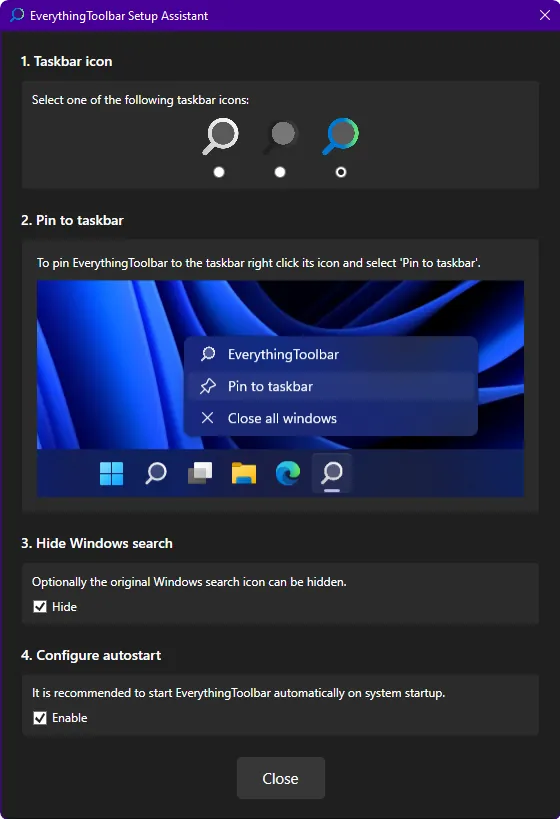
The last step offers to hide the Windows Search Taskbar icon and start EverythingToolbar on system startup. Leave both options enabled and click Yes when asked to restart Explorer.
EverythingToolbar Options
From this point, you can start using EverythingToolbar and Everything without any more setup steps. However, there are a couple of other options available to help integrate the search more deeply into the system in place of Windows Search.
Open the EverythingToolbar results window and click the Options icon near the top right (three dots). Go down to Preferences and enable “Replace Start menu search”, this will open EverythingToolbar instead the Windows Start menu search.
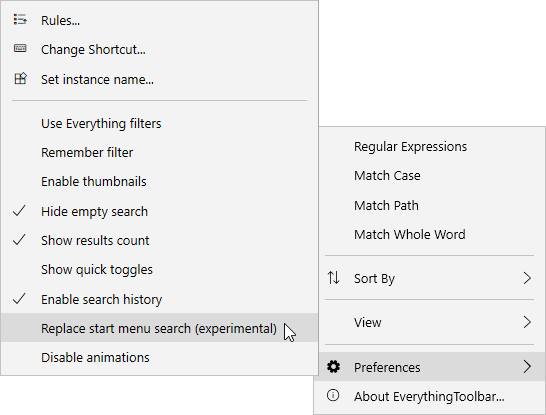
You can also change the default hotkey from Win+Alt+S to the Windows Search default of Win+S. In the Preferences menu, click “Change shortcut…” and choose the desired key combination. Don’t replace the Win+S Windows Search shortcut if you want to evaluate both searches at once.

Most of the other options are related to how the search data is displayed and much of it is down to personal preference. The Rules window could prove useful to more advanced users because it allows for custom “Open with…” commands based on search terms.
QuickLook Integration
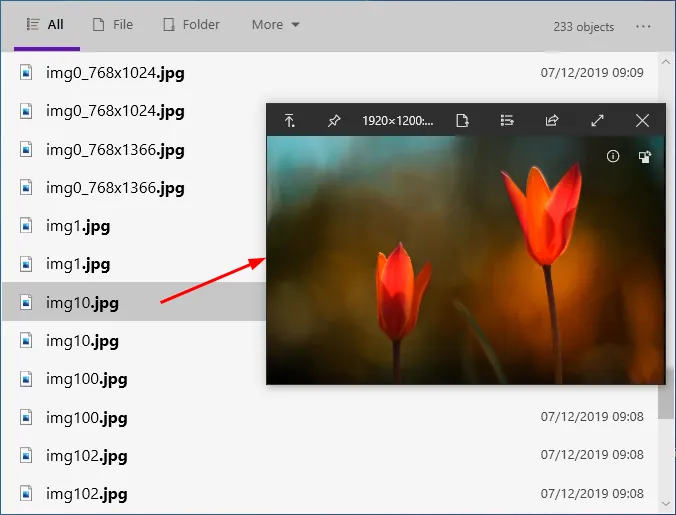
To take the system integration of EverythingToolbar to the max, a third-party tool called QuickLook can be added. QuickLook previews the contents of the selected file with a hotkey, so you can quickly view images, text files, media files, archives, etc.
Once QuickLook is installed and running, highlight a file in the search results window and press Ctrl+Space. A window pops up to show the contents of the file. Additional plugins are available to add extra preview formats to QuickLook, including Office files, ebooks, Torrent files, and folders.
QuickLook can also be used in Windows away from the search window, such as on the Desktop or in File Explorer. Highlight the file and press Space to bring up the preview window.
Theme Color Tip for EverythingToolbar
There currently is no option to manually choose between the dark and light theme for EverythingToolbar because it auto-selects based on the Windows theme. Personally, I prefer the light theme in all conditions. Until there is an option to select the theme manually, here is a simple workaround.
Navigate to the following folder:
C:\Program Files (x86)\EverythingToolbar\Themes\(Win10 or Win11 depending on your system)
Rename “Dark.xaml” to something else and rename “Light.xaml” to “Dark.xaml”. For the theme change to be detected you need to re-add the toolbar to the Taskbar or reboot/log off Windows. You can also do the opposite and rename the dark file to the light file to get a dark EverythingToolbar theme in a light Windows theme.