The Domain Name System (DNS) has other uses besides its original purpose. Ordinarily, your device contacts a DNS server with the domain name of the website you want to visit and it sends back the corresponding IP address. However, it’s possible to take advantage of this system and change the DNS server to something more useful.
Instead of requiring the DNS server to send back a correct IP address, it can send back invalid responses. This essentially blocks a website from loading on your computer. It becomes an effective way to block content you don’t want, such as advertising, trackers, malware, adult or unsavory content, and much more.
Changing the DNS settings on your system is not difficult. But it does vary slightly depending on which operating system or software you use. Here I show you how to change your DNS servers for Windows and popular web browsers.
Adding a Custom DNS in Windows
Windows has always had the ability to change DNS server settings for its network adapters. There is actually more than one way to change DNS and it can be done from Control Panel, Settings, the command line, or via a third-party utility. Here is an overview of three of those methods.
Change DNS from Control Panel
This is the more traditional method and the window where the changes are made is virtually unaltered since Windows XP/2000.
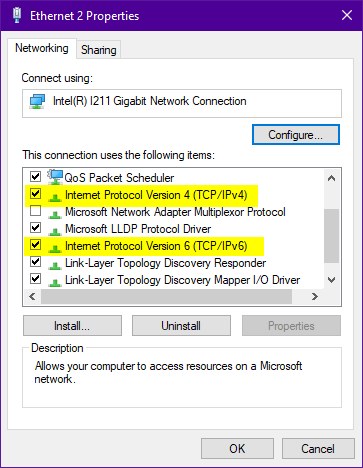
1. The quickest way to open network connections is to type “ncpa.cpl” or “network connections” into the Start search box.
2. Double-click on the network adapter you wish to change, then click the Properties button.
3. This window allows you to change settings for both the IPv4 and IPv6 protocols. Double-click on “Internet Protocol Version 4 (TCP/IPv4)”. You can return to this window after setting up IPv4 to then change IPv6.
4. Select “Use the following DNS server addresses” and enter both the primary and secondary addresses from a DNS service you have. Click OK when you have finished.
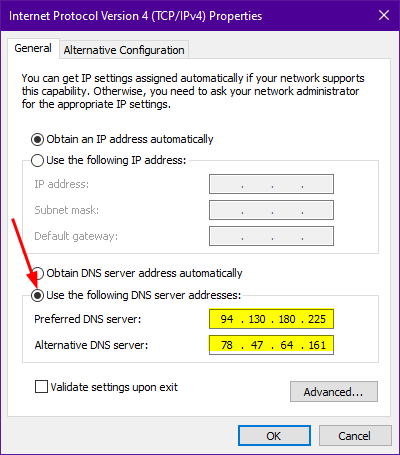
5. Optionally set up the DNS servers for IPv6 as well. Double-click on “Internet Protocol Version 6 (TCP/IPv6)”, select “Use the following DNS server addresses”, and enter the chosen addresses.

When adding the DNS servers, it is recommended to populate both the primary and secondary boxes. This is because Windows 10/11 is known to randomly choose either the primary or secondary address for a lookup.
If you leave the second box empty, Windows can still randomly use the default DNS server supplied by your router. This will likely be the service used by your ISP unless you change DNS to a custom server in your router as well.
Change DNS from Settings
Although you can also change the default DNS server from Settings, I would recommend you use Control Panel where possible. This is simply because entering DNS via Settings doesn’t always seem completely reliable. However, feel free to use Settings if it works fine for you.
Windows 10
There are differences in changing the DNS settings between Windows 10 and Windows 11, so I will explain them separately.
1. Click on Settings > Network & Internet, then click Properties on the network adapter that is connected to the Internet.
2. Under “IP settings” click Edit, click on Automatic (DHCP), and change it to Manual. Enable the IPv4 and/or IPv6 switch depending on which setting you want to edit.
3. Enter the preferred and alternative DNS servers from your favorite service. Once you are done, click Save.

Sometimes, Windows might complain that it cannot save the selected IP settings. This usually means it doesn’t like one or both of the entered DNS servers. Either choose different servers or use Control Panel where it won’t complain.
Windows 11
One of the new features of Windows 11 was the inclusion of built-in DNS over HTTPS support. This was also going to be included in Windows 10 but was annoyingly dropped in favor of making it a new “feature” in Windows 11. Windows 11 also separates the DNS servers from IP assignment, which is a good thing.
1. Open Settings > Network & Internet, and click on Ethernet or WiFi near the top to open that connection’s options.
2. Press Edit next to “DNS server assignment” and change from Automatic (DHCP) to Manual. Enable one or both IPv4 and IPv6 to edit.
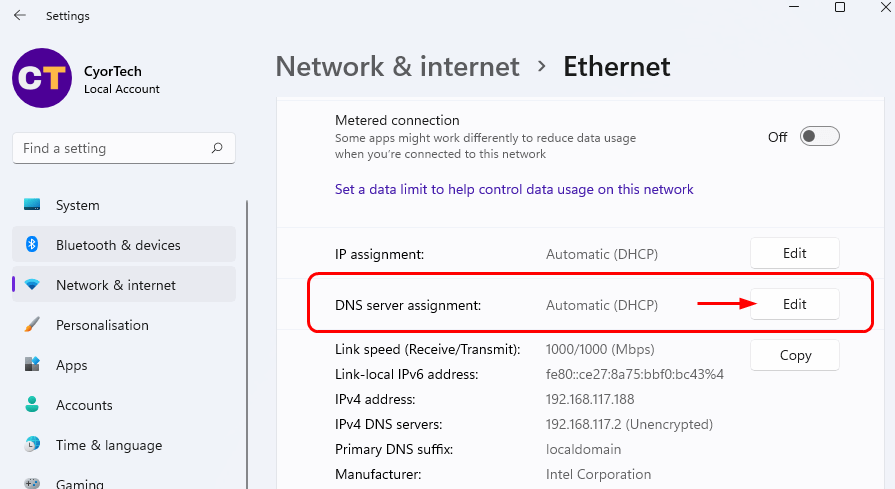
3. Like in Windows 10, just add the preferred and alternative DNS server addresses, then press Save.
Read the “DNS over HTTPS in Windows 11” section below if you want to enable DNS encryption in Windows 11.
Change DNS from the Command Prompt
While this method is more advanced, you can include it in a simple batch file to change DNS settings on double click. The two things you need to know are the name of the network adapter to change the DNS for, and the new DNS server addresses to add.
Netsh int ipv4 set dns name=[adapter] static [DNS server] primary
Netsh int ipv4 add dns name=[adapter] [DNS server] index=2
Netsh interface IP show config [adapter]
The first command sets the primary DNS server, the next is for adding the secondary server. This also works for IPv6 addresses, just change the ipv4 argument to ipv6 and add an appropriate server address. The third command is optional and simply displays the adapter information to see if your DNS changes have worked.
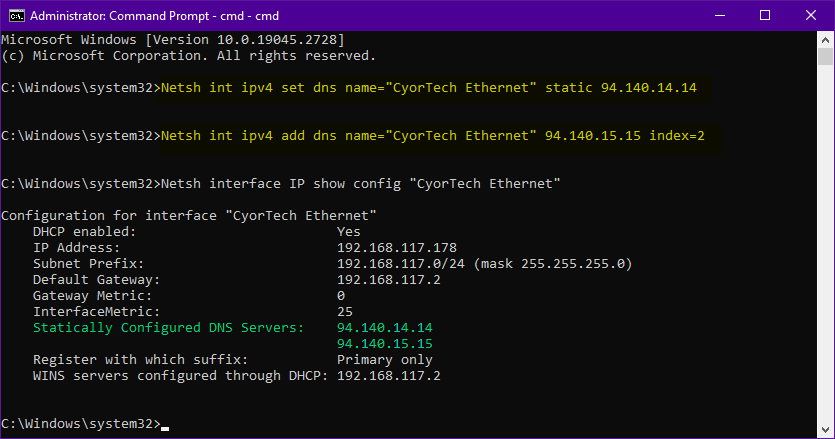
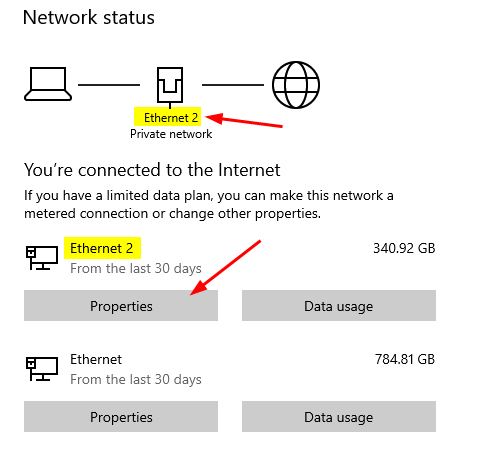
An easy way to find the network adapter name is by going to Settings > Network and Internet > Status.
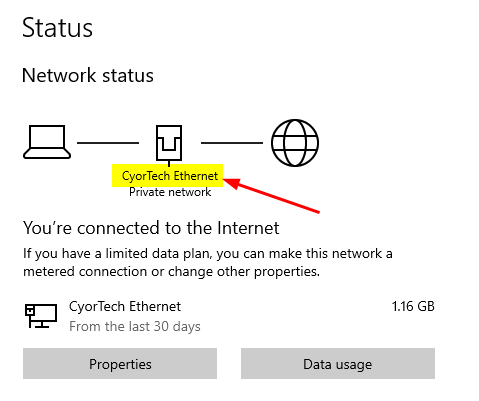
The adapter currently providing internet appears in the graphic at the top. You can add these commands to a batch script so you can quickly switch between different DNS servers.
Use a Third Party Tool to Change DNS
If you don’t fancy playing around with DNS servers yourself, there are tools around that can do it for you. There are several free tools that are able to change the DNS but I’ve picked a couple that I think are the best and easiest to use.
NirSoft QuickSet DNS
NirSoft is a website that produces dozens of useful tools for a wide range of uses, and they are all portable. QuickSetDNS is one of those tools and it allows you to quickly swap between different DNS servers with just a few clicks.
All you have to do is launch QuickSetDNS and make sure the correct network adapter is selected in the drop-down menu at the top. Highlight the DNS you want and press F2 or press the green circular button on the toolbar. The F2 shortcut will only change IPv4 servers, press F7 to change both IPv4 and IPv6 servers (if provided).
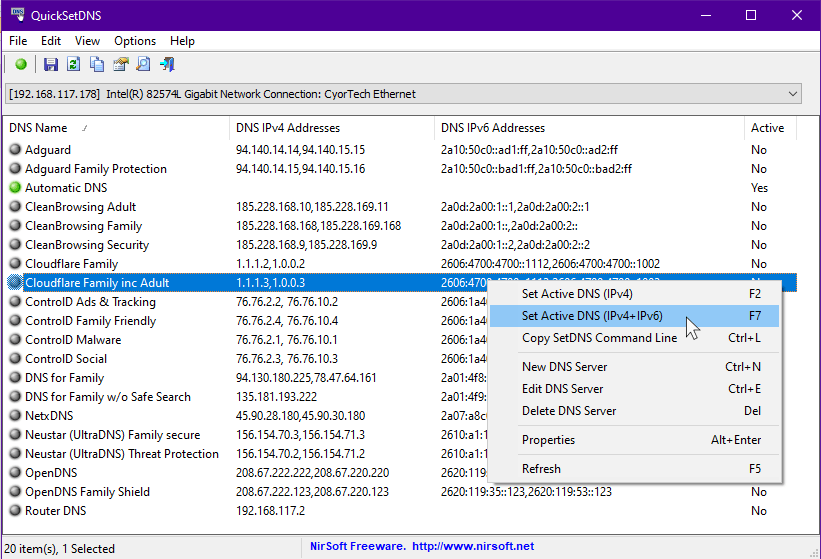
The included DNS servers are Google, CloudFlare, and Quad9 but only Quad9 offers filtering (malware). The other two do not offer any substantial filtering. I have created a custom list for QuickSetDNS that includes all the DNS services from my article “9 Free DNS to Block Ads, Trackers, Malware, or Porn“.
Download and extract the Zip archive, then place the CFG file in the same folder as the QuickSet DNS program. You can also add your own DNS servers, all that’s required is a name and the IPv4 and/or IPv6 addresses.
Sordum DNS Jumper
DNS Jumper has a few more advanced functions than QuickSetDNS but it’s still easy to use. It also boasts a much larger built-in list of DNS servers (35), some of which are included in the previous DNS article.
One of the extra features is a Fastest DNS option. It checks all DNS servers in the list and records the speed of each, then tells you which is the fastest. There’s also an option to flush the system DNS cache, which is needed if you are getting incorrect DNS results.
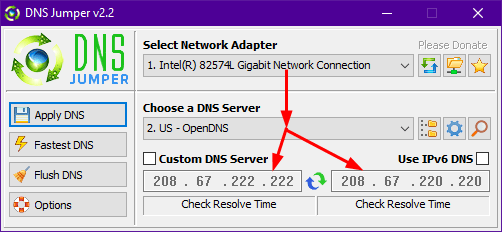
All you have to do is choose the network adapter from the list, select a DNS server from the dropdown, then click Apply DNS. The circular arrows in the middle check the speed of the selected servers before applying. All DNS servers are listed by default but there are filters for Family Safe, Secure, and IPv6 servers.
DNS over HTTPS in Windows 11
Although Windows 11 supports DNS over HTTPS, it is limited to just three DNS services by default. They are Google, Cloudflare, and Quad9. This is why you will only see the DNS encryption box become available when the IP address of one of those services is entered into the boxes.
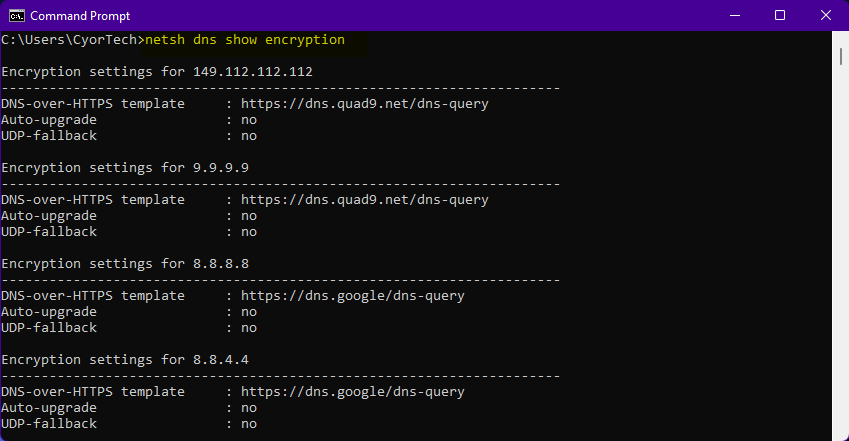
If you read my article talking about DNS servers that can block ads or adult content etc, they offer more than the three options provided. To see what encrypted servers are currently available in Windows 11, open a Command Prompt and type:
Netsh dns show encryption
If you’ve never changed from the defaults, the three DNS services above will show.
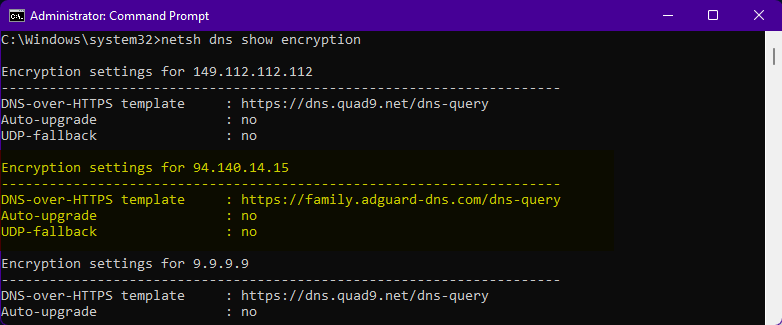
Thankfully, it is possible to add other DNS services to the list. As long as your favorite service supports DOH and has a matching IP address available, it will work. Enter the following command into an Administrator Command Prompt.
netsh dns add encryption server=[IPv4/v6 address] dohtemplate=[DOH URL]
Here are a few examples from the previous DNS server article.
CleanBrowsing Family Filter – Netsh dns add encryption server=76.76.2.3 dohtemplate=https://freedns.controld.com/p3
Cloudflare Malware and Adult – Netsh dns add encryption server=1.1.1.3 dohtemplate=https://family.cloudflare-dns.com/dns-query
AdGuard Family Protection – Netsh dns add encryption server=94.140.14.15 dohtemplate=https://family.adguard-dns.com/dns-query
If you run the show encryption command again, the new server(s) will appear in the list.
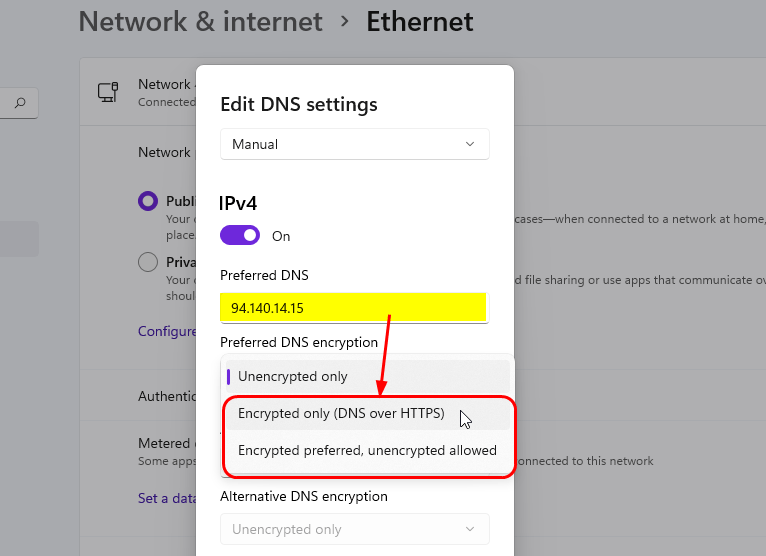
Now all you have to do is go back into Windows Settings and enter the IP address for the service in the preferred/alternative DNS box. The encryption box will be available where you can now select “Encrypted only (DNS over HTTPS)” or “Encrypted preferred, unencrypted allowed”. The second option offers a fallback in case of issues.
To remove an encrypted DNS template, use the following command.
Netsh dns delete encryption [IP address]
You can use both IPv4 and IPv6 IP addresses when adding an encryption template.
Add a DNS Service to your Browser
Adding a custom DNS directly into a web browser has been possible in recent years. The main disadvantage here is obviously any benefits from a different DNS only affect that browser and nothing else. But, if you want to use a family friendly DNS service just for web browsing, it may be all you need.
Being able to use a different DNS works in Chrome, Firefox, and other third-party browsers based on Chromium and Firefox. Only DNS over HTTPS URLs will work so you don’t enter standard unencrypted IP addresses.
Google Chrome (and Chromium browsers)
While the Secure DNS feature will be available in most browsers based on Chromium, there may be a few exceptions. However, the option is there in all the big name browsers like Chrome, Brave, Vivaldi, Opera, and Edge.
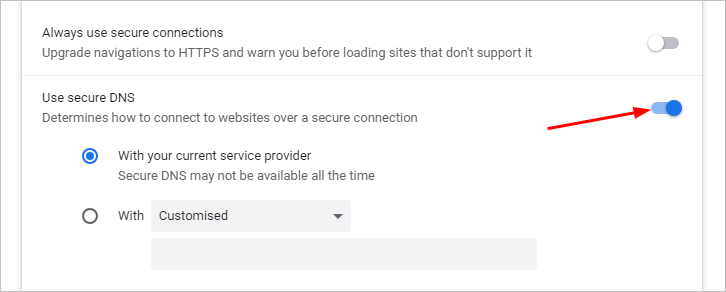
1. Enter the following URL in the address bar for your browser to go directly to the page containing the Secure DNS option (you may have to scroll down).
- chrome://settings/security (should work in most browsers that are not Edge/Opera)
- edge://settings/privacy
- opera://settings/system
2. Enable the Secure DNS option if it isn’t already. You can leave the setting at “With your current service provider” if you have previously set up DNS over HTTPS in Windows 11, for instance. Otherwise, select “With”.
3. There are four default encrypted DNS servers; Google Public DNS, Cloudflare, Cleanbrowsing, and OpenDNS. Cleanbrowsing offers the best out-of-the-box filtering of content not suitable for children. If you are happy with one of the defaults, simply select it from the list and DNS over HTTPS will use the selected service.
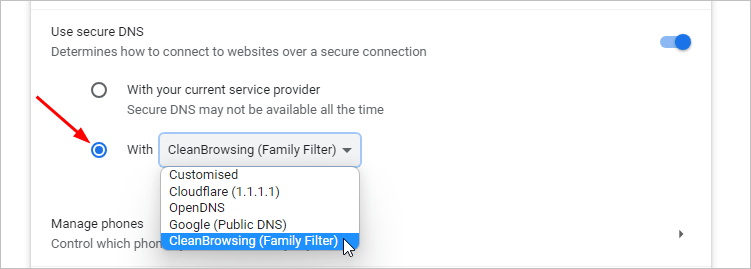
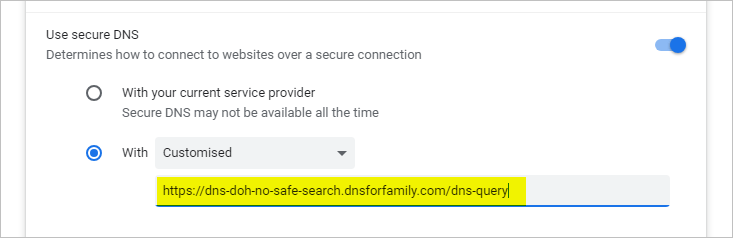
4. You can also use another service, such as one from my 9 Free DNS to Block Ads, Tracking, Malware, or Porn article. Select Customised from the dropdown and paste the DNS over HTTPS URL from that service into the box.
While some browsers word the setting differently (Edge) or have slightly different options (Opera), how to use Secure DNS is essentially the same.
Mozilla Firefox
A similar DNS over HTTPS option is available in Mozilla Firefox and compatible browsers.
1. Paste the following URL into your browser to go directly to the security settings page.
about:preferences#privacy
Scroll down to the bottom and there will be a number of settings for DNS over HTTPS.
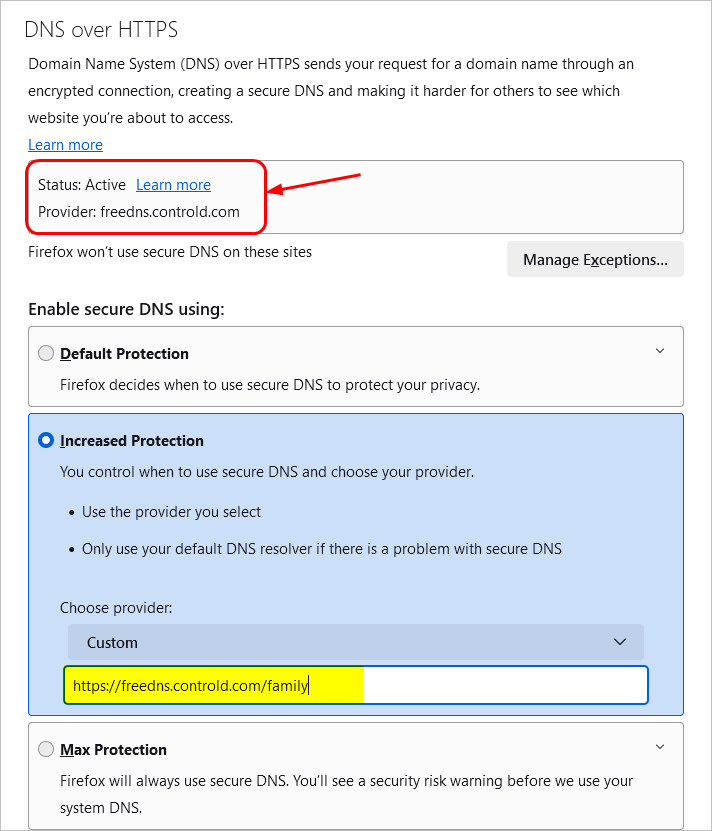
2. The Default Protection leaves it up to Firefox to decide how, when, and where to use DOH. Increased Protection would be the best option as it uses DOH where possible but will fall back to a standard DNS if there is a problem.
3. A couple of providers are available, they are Cloudflare (default) and NextDNS. Alternatively, choose Custom and add your own encrypted DNS service into the box.
Firefox goes a step further than Chrome because it also includes an exception list. Add a website or domain to the list and it won’t use DNS over HTTPS.
Limits of Blocking Content with DNS
Although blocking content via DNS can be a great way to help block undesirable websites and domains, it does have limits. The biggest issue is it can only block whole domains and not individual pages or subdomains. This is why DNS filtering alone cannot remove ads on popular sites like YouTube, FaceBook, etc.
As they serve ads from the same domains as their content, you cannot block just the ads without blocking the website. The principle is the same for any website that serves its own ads or other content you wish to block.
Change DNS Settings in your Router
Being able to change the DNS in your router will affect all devices that connect to it so they all use the same service. A custom DNS on the device itself will still override this setting but it’s a quick and easy way to get all connected devices onto the same DNS server.
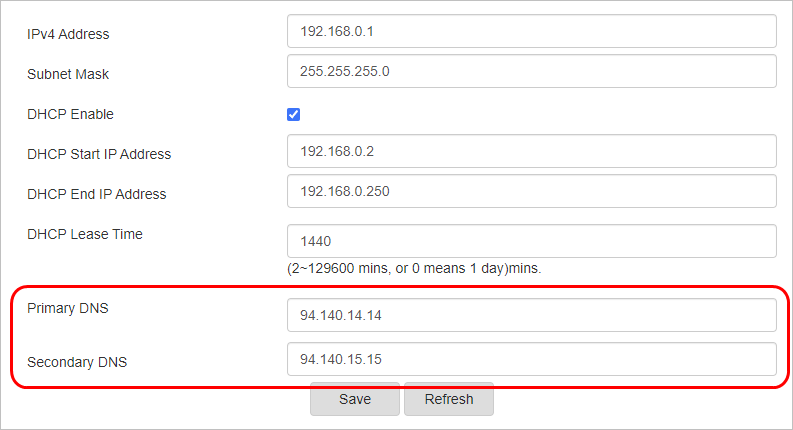
Not all routers can change to a custom DNS, especially those supplied by an ISP. The option will also differ in name and location from router to router so you may have to read the manual. The router DNS can still act as a useful fallback if local device DNS settings are not working properly.