Everyone knows that a video is essentially made up of a number of still images played in sequence. This is true whether it’s a stop-motion animation or the latest blockbuster Blu-ray movie. Each image is called a frame and it’s possible to extract frames from a video file so you can use them as wallpaper, re-encode them, or something else.
Of course, it’s easy to capture a single frame, just pause a video and take a screenshot. Extracting a number of, or all frames from an entire TV show or movie is a little more involved. Here I show you how to extract video frames from a video and save them to a common image format using the hugely popular VLC Media Player.
How VLC Extracts Frames
It is important to know that VLC extracts video frames in real-time. And that makes no difference whether you are trying to get every frame from the video or every nth frame. Therefore, you will need to play the video uninterrupted until you have the required number of extracted images.
How to Extract Video Frames to Images in VLC
Even though extracting video frames using VLC is slow because it’s in real-time, it’s still a hugely popular method. There are actually two different ways that images can be saved from frames. The first is from the main VLC user interface and the second is from the command line.
Extract Frames from the User Interface
This method is easier for less advanced users as it’s mostly point-and-click to set up.
1. Download VLC Media Player from the VideoLAN website. Click the arrow to the right on the download button to select a portable archive.
2. Launch VLC and go to Tools > Preferences (Ctrl+P).
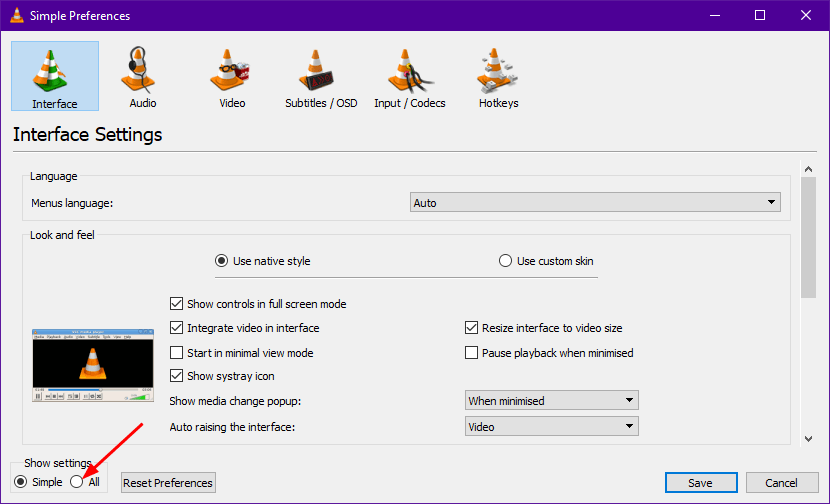
3. At the bottom left of the window, click All. This shows the full preferences view.
4. Scroll down the list on the left and find the Video section. Then select the Filters subsection.
5. Check the box for Scene video Filter in the filters list on the right.

6. Double-click on the Filters entry in the tree view, and select Scene filter.
7. The Scene filter options define how and where the extracted images are saved. Here’s a brief rundown of options.
- Image format – Defaults to PNG but you can also save images to JPG, TIFF, or BMP.
- Image width/height – Adjust this to change the saved image resolution. The -1 values will adjust the width and height proportionally to each other.
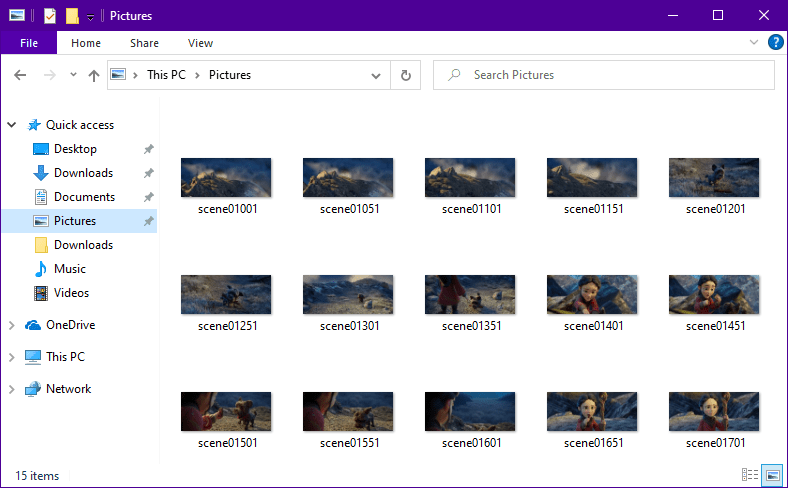
- Filename prefix – The base filename for all images (e.g. scene0001.JPG, scene0002.JPG, etc).
- Directory path prefix – Images are saved to your Pictures folder by default. A path added here changes the save location.
- Always write to the same file – You probably won’t need this as it writes to the same file over and over.
- Recording ratio – Tells VLC to extract an image every x number of frames. Set to 1 for every frame, 30 for every 30th frame.

8. Click Save once you have configured the settings. Note, you would still get saved images if the options were left at the defaults.
9. Start playing the chosen video and VLC will extract frames to the selected path. Be aware that VLC will continuously extract frames until you press stop or the video ends. Pausing will still produce images.
Once you have finished getting the images, go back and turn the Scene Filter off (step 5). Otherwise, VLC will extract frames from every subsequent video playback until you do.
If You Get No Extracted Images from VLC
There is a known issue in VLC that sometimes it does not recognize the Scene Filter has been enabled after you click Save. A simple solution is to close VLC and open it again, then play the video.
Also, make sure that you are not saving images to a protected folder. C’s root, Windows, and Program Files are some folders protected by User Account Control and cannot be saved to. A workaround is running VLC as administrator. However, it’s recommended to just use the default Pictures folder or another folder in your profile directory.
Extract Video Frames Using VLC from the Command Line
Using VLC from the command line is more advanced than from the main user interface, and it does have a few advantages. One of them is the ability to set a start time to begin extracting frames and a run time or stop time to run the video for a specified period. This is useful to skip opening credits or stop before ending credits, for example.
Open a Command Prompt and change the current directory (cd) to where VLC is located. Here are some command examples.
VLC videofilepath –video-filter=scene –vout=dummy –no-embedded-video –qt-start-minimized –scene-ratio=5 –scene-path=saveimagespath vlc://quit
VLC videofilepath –video-filter=scene –vout=dummy –no-embedded-video –qt-start-minimized –start-time=120 –run-time=60 –scene-ratio=5 –scene-path=saveimagespath vlc://quit
VLC videofilepath –-video-filter=scene –vout=dummy –no-embedded-video –qt-start-minimized –start-time=120 –stop-time=180 –scene-ratio=5 –-scene-path=saveimagespath vlc://quit
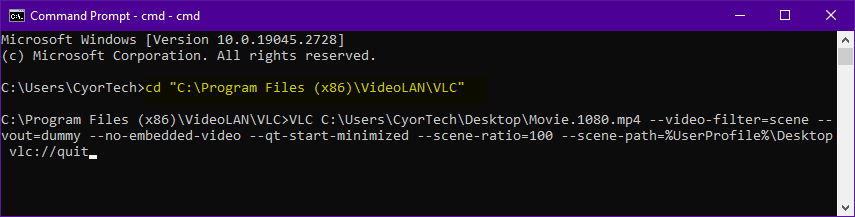
The first command plays the entire video and saves an image every 5 frames. The second command will start extracting at the “start-time” and play the video for the “run-time” (in seconds). The third command just swaps “run-time” for “stop-time” so the video will stop playing at a specific time.
The “vout=dummy”, “no-embedded-video” and “qt-start-minimized” arguments force VLC to play the video and extract video frames in the background. Control or stop playback from the VLC tray icon menu. If you want to watch the video at the same time, omitting just the “vout=dummy” argument will work.
Here are a few more related commands you can use.
–aout=dummy – Mutes the sound during playback.
–scene-format=PNG|JPG|BMP – Choose the save image format.
–scene-width=-1/–scene-height=-1 – Save to a different image size from the input video.
There are hundreds of other commands for VLC, have a look at them on the VLC website.
The CyorTech VLC Scene Filter Frontend
This is a tool I’ve created myself and it takes some of the hassle out of setting up VLC yourself to extract frames. It has two modes for extracting.
The first mode is launching VLC using its command line options. As mentioned previously, you can supply extra options like start time and duration so frame extraction will start and stop automatically. Also, the command line makes it possible to run VLC quietly in the background while extracting is in progress.
The second method is directly editing VLC’s vlcrc configuration file so you don’t have to keep going through the preferences. Then when you launch VLC, it will already be set up to extract frames when you load a video.
Here are the options available in each tab, they are essentially the same as VLC itself.
VLC User Interface Tab

- Image Format – Save the images as BMP, JPG, PNG, or TIFF
- Size (px) – The resolution to save the images. The default of -1/-1 is the original resolution.
- Save every xx frames – Saves every nth frame as an image. A value of 1 will extract every frame.
- Get Video fps – This lets you browse for a video file and it will show you its frames per second.
- File name prefix – A base name to give the extracted images (default is “scene”).
- Reset – Reset the Scene filter settings back to VLC defaults.
- Save to – Choose the directory to save the extracted images (default is Pictures).
- Enable Scene Filter – Turns the Scene Filter on or off. Make sure the filter is off when you don’t need to extract frames from a video.
- Apply – Write the settings in the window to the VLC vlcrc config file.
VLC Command Line Tab
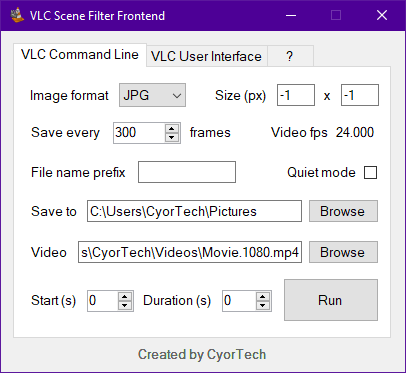
Image Format, Size (px), Save every xx frames, File name prefix, and Save to are the same as the tab above. Here are the different options.
- Quiet mode – Runs VLC quietly in the background during frame extraction.
- Video – The video file to process. The Video fps text above it will display the frames per second of this file.
- Start (s) – Starting position in seconds from the start of the video. A value of 0 will play from the start.
- Duration (s) – The number of seconds from the start position to play the video. A value of 0 will play to the end.
- Run – Start the process.
The CyorTech VLC Scene Filter Frontend (SFF) is completely free to use, portable, and programmed in C#. SFF will detect whether you have an installed version of VLC and use that first. It can also work with a portable version if you place SFF in the same folder as the VLC executable. Otherwise, you will be asked to browse for the vlc.exe.
I welcome any feedback or suggestions you might have for this tool. Please reply in the comment section below or send me a message via the Contact form.
Download CyorTech VLC Scene Filter Frontend
If VLC is Dropping Frames
Although VLC should be able to extract frames from videos quite easily on many systems, it might not do it reliably on all. Extracting frames might seem like a trivial thing, but it does require a little bit of horsepower in terms of system hardware.
If you are trying to save every frame, somewhere between 24 and 60 images will be extracted and saved to the drive each second. Add to that the resolution of the video, which could be up to Ultra HD. If you find VLC is skipping frames, try a video with a lower resolution or a lower framerate as it could be your hardware is not quite fast enough.
Otherwise, try something less demanding like every other frame. Also, make sure no other intensive tasks are running on your system.
Extract Video Frames with Tools Other Than VLC
If you prefer not to use VLC Media Player for getting still images from video files, there are, of course, alternatives. POT Player and GOM Player are two media players that offer single or multiple image frame extraction. They also work in real-time so will take however long your video clip is.
Another option is Free Video to JPG Converter which is different in that it doesn’t save images in real time. This will make it much faster to get your images extracted but it will also be less accurate.