Many businesses offer free or paid WiFi when you are not within range of your own network. They often have a WiFi login page where you enter a password and perhaps a username to gain internet access. This method of logging into a network is known as a captive portal.
A WiFi login page is beneficial if you want to have several users connect to your own internet with a degree of control over how they use it. This could be neighbors, friends and family, employees, etc. There are well-known captive portal applications for other operating systems like Linux’s pfSense, but very few work in Windows.
Here I show you how to set up a login page for your wireless internet in Windows.
Hardware Required for a WiFi Login Page
The most obvious hardware you need is an active internet connection through a Wireless network adapter. This can be on a laptop or your main PC. If you want to use a desktop PC but have no built-in WiFi on the motherboard, a PCIe or USB WiFi adapter will work.
For best results, it’s preferable to use both a wired connection and a wireless connection on the same computer. This should be your first option unless the computer simply does not or cannot have both types of connection.
Create a WiFi Login Page With Two Network Adapters
While using a single network adapter to create the captive portal works, it’s better to use two adapters. It takes some of the load off the WiFi connection, which should mean a potentially more stable and faster experience for users attached to the wireless hotspot.
1. Firstly, download and install MyPublicWiFi from True Software.
2. Make sure your internet is working through the wired network adapter. Also, disconnect from any wireless network if one is connected.
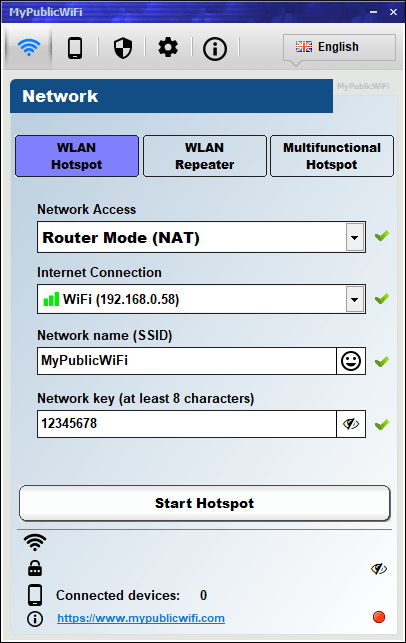
3 Launch MyPublicWiFi, make sure the network type is set to “WLAN Hotspot” and change to the following settings.
- Network Access – Bridging Mode
- Internet Connection – Ethernet (or the name of your wired network adapter). Check there is a valid IP address attached to the adapter.
- Network name (SSID) – The name of the SSID for your hotspot network, it can be left at the default of MyPublicWiFi.
- Network key – The WiFi password for the hotspot (change this from the default). Give it to users of your network.

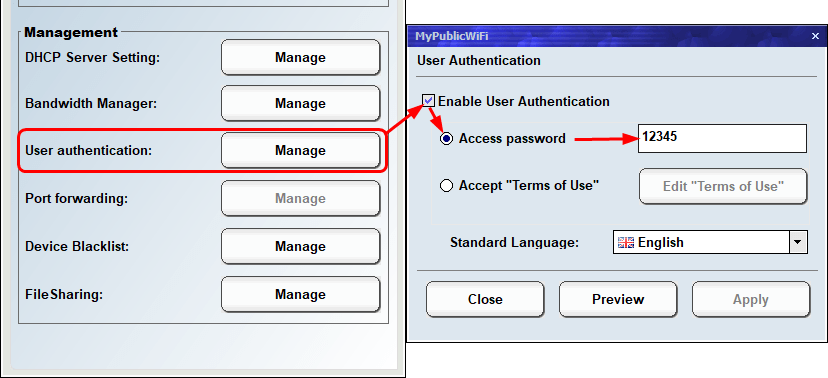
4. Head to the settings tab (cogwheel icon) and click on the Manage button for User authentication. Check the “Enable User Authentication” box, select “Access password” and choose a password. Click Apply to finish.
5. Go back to the Network tab and make sure all the settings have a green check next to them, then press Start Hotspot.
If things go to plan, the light at the bottom right will turn green along with showing the connected WiFi hotspot.
Create a WiFi Login Page With a Single Network Adapter
While using two adapters is better overall, it’s possible to create the captive portal using just an active WiFi connection. However, if the WiFi adapter on your computer is old or not particularly fast, it could create traffic bottlenecks. This will depend on the number of users and your internet connection speed.
1. Download and install MyPublicWiFi.
2. Make sure to connect the WiFi adapter to a wireless network with access to the internet.
3. Open MyPublicWiFi and make sure WLAN Hotspot is the selected type. Use the below settings.
- Network Access – Router Mode (NAT)
- Internet Connection – WiFi (or the name of your wireless network adapter). Make sure it has a valid IP address.
- Network name (SSID) – The name of the SSID for your hotspot network.
- Network key – The WiFi password for the hotspot.
4. Go to the settings tab and click Manage for User Authentication. Check “Enable User Authentication”, then select “Access password”, enter a password, and click Apply.
5. Press Start Hotspot on the Network tab.
DHCP Settings for a Single Network Adapter
Because Router mode is being used with one adapter, MyPublicWiFi utilizes its own DHCP server. More advanced users can change the default address range and some other related options. Go to Settings and click the Manage button next to DHCP Server Setting.
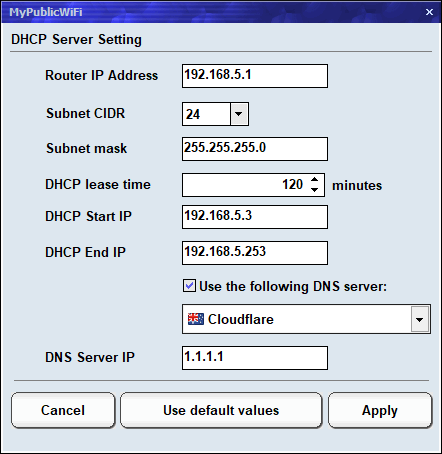
In addition to Subnet, lease time, and Start/End IP, there is an option to use a custom DNS server. You can select from a number of DNS presets, including Cloudflare, Google, Neustar, AdGuard, and CleanBrowsing. Or choose User Defined and enter your own custom DNS server IP in the box below.
Connecting to the Hotspot and Login Page
Now you have activated the captive portal and hotspot, it’s time to connect and try it out. To start, all you need to do is find the SSID from MyPublicWiFi in the available networks list on your device, then connect with the network key. What happens next depends on what type of device you connect with.
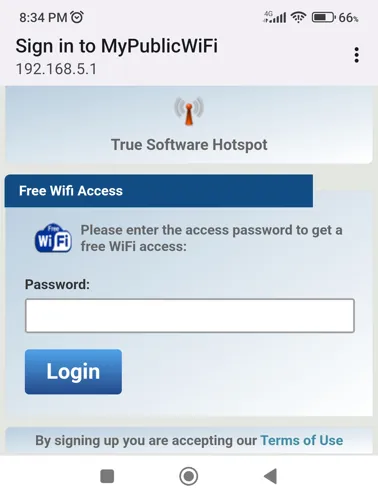
Connect a smartphone and you will receive a notification to sign in to a WiFi network. Connect a PC/laptop and the login page should automatically open in a web browser after connecting to the wireless network.
Other Useful Functions in MyPublicWiFi
So far, we’ve only needed to use functions that are directly related to getting the WiFi login page and hotspot up and running. However, there are several other features you might find useful.
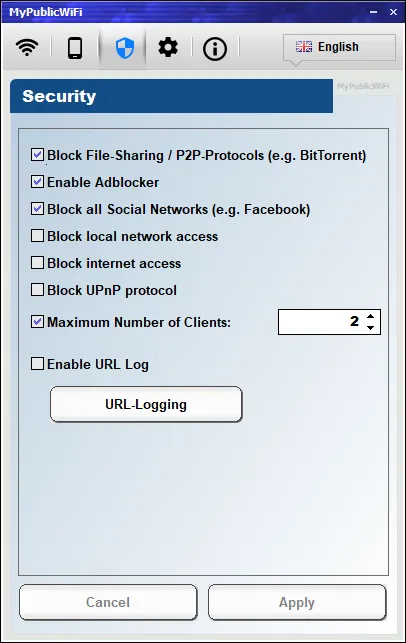
- The security tab – There are some interesting options here. Checkboxes are available to block Filesharing/P2P, ads, social networks, network/internet access, UPnP, and restrict the connected client count. A word of caution is the blocking options don’t seem to be fully reliable. For example, I could still connect to Facebook and Twitter.
- Bandwidth manager – There are options to restrict upload and download speeds. This includes restricting bandwidth based on MAC address.
- Port forwarding – Some might find this handy as it has some built-in presets for game consoles. Forwarding is only available in the single adapter Router Mode.
- Device Blacklist – Devices can be blocked from using the hotspot based on their MAC address. It’s not foolproof but works for general use. Quickly add devices by right-clicking on a device in the Clients list and choosing “Lock Device” from the menu.
- File Sharing – This has nothing to do with BitTorrent. It allows you to provide a dedicated page where users can download a selection of files provided by you. You can also allow files to be uploaded by users with restrictions on file size and file type. The address is hotspotIP/sharing.html or use the QR code.
It’s recommended to log everyone out and restart the hotspot after making any major setting changes. You can log users out on the Clients tab, just click the menu button and log out all clients from the User Authentication sub-menu.
Create a More Advanced WiFi Login Page with MyHotSpot
Something that MyPublicWiFi lacks is being able to set up user profiles. With a profile, individual users can have their own login passwords, download limits, usage timer, and much more. Thankfully, True Software does actually have a more advanced application than MyPublicWiFi, called MyHotspot.
The biggest downside with MyHotSpot is it’s aimed at the professional side of hotspot access. It includes payment systems, SMS authentication, vouchers, and even food/drink sales. Several settings have to be turned off but it makes MyHotSpot work like a more capable version of MyPublicWiFi.
Before You Start MyHotspot
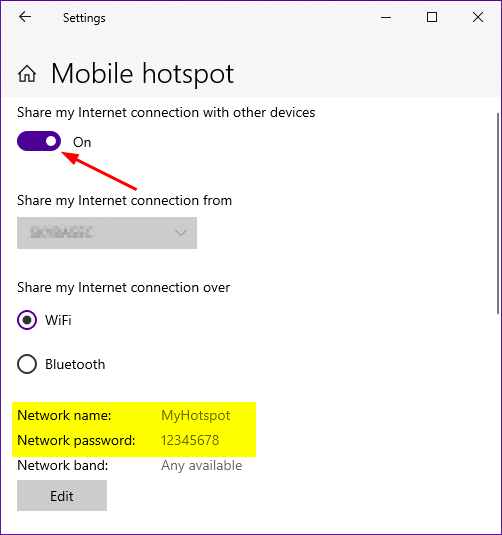
An extra step you have to perform to get MyHotSpot working is creating your own WiFi hotspot in Windows. This is easy in Windows 10 and 11, simply go to Settings > Network & Internet > Mobile Hotspot, then turn the option on. It’s possible to change the network name (SSID) and the network key by pressing the Edit button.
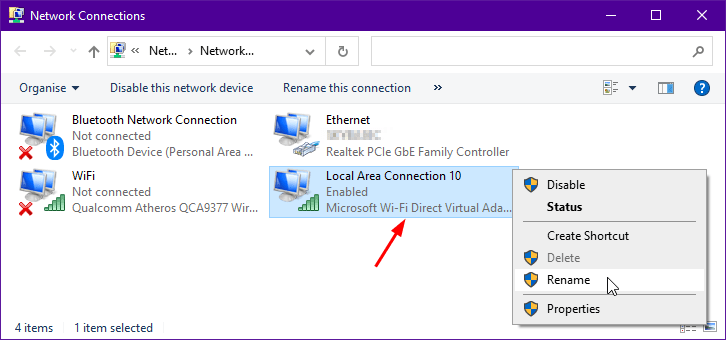
This creates an extra network connection called “Microsoft Wi-Fi Direct Virtual Adapter” which will be the hotspot devices will connect to. If you wish, it can be renamed for easier identification.
Setting Up MyHotSpot
Like MyPublicWiFi, MyHotSpot will work with two network adapters (one wired, one wireless) or a single WiFi adapter. The network configuration window opens during the first launch, here are the settings to use.
With Two Adapters
- Network card with the internet connection – In this scenario, the Ethernet adapter will be the one to choose.
- Network card to WLAN Access Point – This will be the hotspot connection.
- Configure the network using the bridging mode – Enable this option.
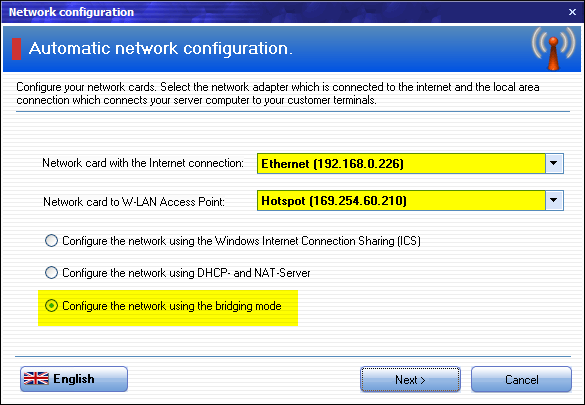
Click Next to set up the connection.
With One Adapter
- Network card with the internet connection – This time, the WiFi adapter will be the one to choose.
- Network card to WLAN Access Point – Choose the hotspot connection.
- Configure the network using DHCP and NAT Server – Enable this option.
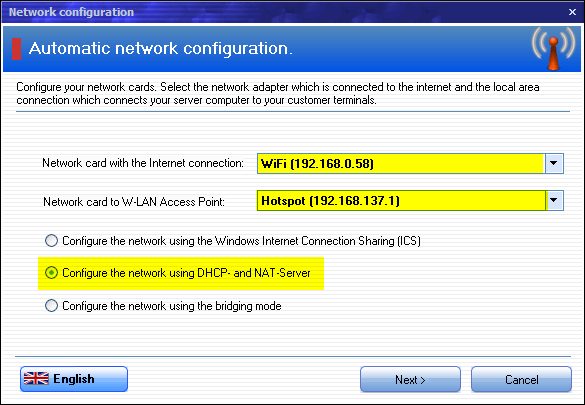
When you click Next, a DHCP/NAT configuration window will appear. If you are unsure what settings to use, just click Use default values and then Set up
Disable Options that are not Required
If you want a more simple setup in MyHotSpot with different profiles for different users but without payment options, a number of options will need disabling. Click on the Edit menu and select Hotspot Configuration.
- Access – This determines what appears on the WiFi login page. “Enable user account registration” is the most important option to keep enabled as that is the username/password dialog. Everything else on this page is optional and can be disabled if you choose. Use the Preview button at the bottom to test your settings.
- Free URLs – Disable
- Firewall – Enable and configure this for a bit more security.
- PayPal – Disable
- Web Filter – This is optional but could be useful to block certain URLs or enable the ad/social blocker.
- SMS authentication – Disable
- Free Hotspot – Disable
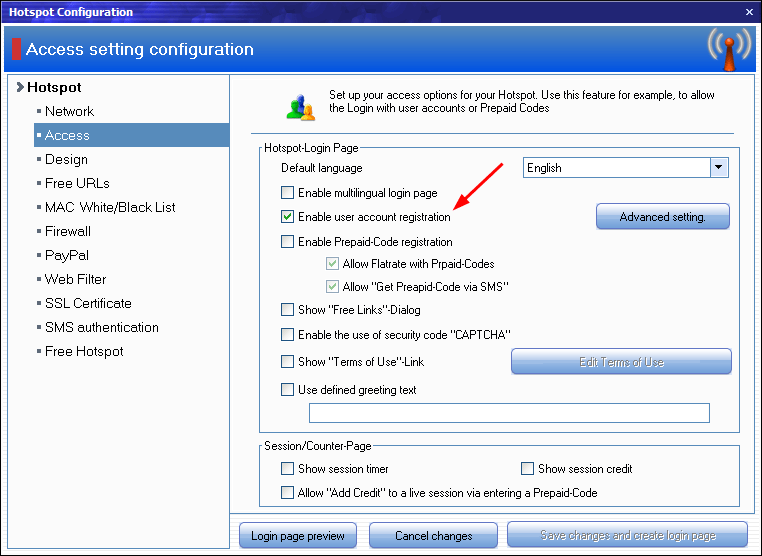
Click save once you have configured the settings. The next thing we have to do is turn off the tariffs. If you don’t do this, users will keep being told they have insufficient credit when logging in. You can create separate tariffs for different users, but for simplicity, we’ll just turn the tariffs off.
Go to the Edit menu > Tariffs and Security. On the Tariffs tab, the Default profile is already highlighted, so just click Edit. Near the bottom, change the “Basic hourly rate” to 0 and click OK.

Although I won’t go into it here, per profile bandwidth management is also controlled from this window.
Create a User Account in MyHotSpot
The last thing you need to do before trying to connect a device is create a user profile. Without this, you cannot log in. Go to the Actions menu > “Create user account” and enter a username and password twice. Note the user name is case-sensitive so it might be useful to capitalize the first word to help phone users.
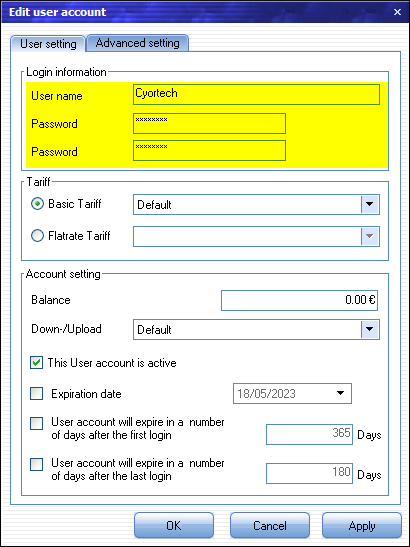
Unless you want to set an expiry for the account, there is nothing else that needs changing for a basic setup. Connect to the hotspot to get your new login page. Then you can sign in with the credentials of any user accounts that have been set up.
Tip: Add a Personal Title to the Login Page
MyHotSpot gives you some flexibility in how the login page looks, including the background color and the logo image. However, it gives no option to change the title of the login page and it’s limited to “True Software Hotspot”.
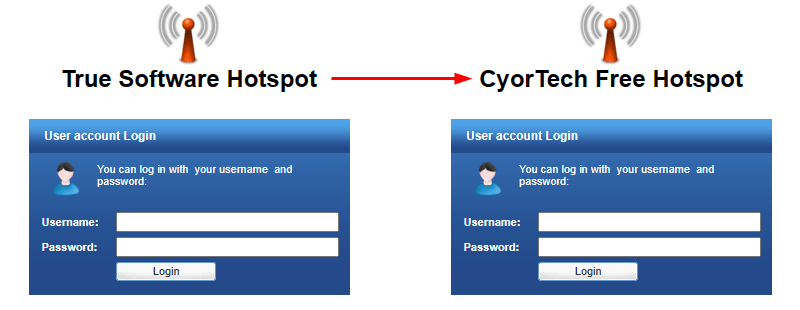
There is an easy way to change the title, just go to MyHotSpot’s Program Files folder, and into the Web folder. Edit the log.html file with a text editor and replace “True Software Hotspot” with your own text. The mobile folder contains the phone version of the log.html login page, you can edit that too. This edit also works for MyPublicWiFi.
Alterntives to MyPublic WiFi and MyHotSpot
Actually creating a captive portal from within Windows is not that common compared to other operating systems. Although I believe the two tools mentioned here work while being not too difficult to use, there are a couple of alternatives. ARPMiner is interesting but I was unable to get it to work at all. Microsolut was not tested.